Posts

Gathering Your Tools for Paper Flower Making

Hey everybody!  It's been quite awhile (years) since I've posted anything. Happy Independence Day!  I hope everyone is enjoying time with their families and friends.   I've had several requests on my Facebook business page, https://www.facebook.com/beauandjolie/ of people wanting to know how I make my paper flowers.  I do teach classes locally in the OKC metro area an am willing to travel.   I thought I'd start posting here again with instructions to easy flowers.  I'm posting these for free, but have included my Amazon Affiliate links for the tools and supplies.   The most important thing you'll need is the paper molding tools from McGill.     Next, you'll need a padded mat to work on.       A flower paper punch will also be needed to get you started.  If you don't have one, the EK Success Retro Flower Punch is a good versatile one to work with.     A glue gun is the easiest and quickest way t...

Ghosts and Goblins...Day Two!

Image
Thanks for stopping by to see my Day Two projects for Nicolette's  Ghosts and Goblins blog hop. If you jumped in here, click on Nicolette's link to start at the beginning to see everyone's wonderful projects.  You should have come here from Robin . I should have started earlier working on Halloween projects.  I am having too much fun and can't seem to stop myself!  My kids, ages 20, 18 and 14, are old enough they don't have school Fall parties anymore.  One of my favorite things for all school parties is making goodies for them to pass out to their classes.  Luckily, I have an adorable nephew who calls me "Favorite Aunt Jackie" who I can make goodies for.  I keep telling my sister he's my grandma practice.  I used SVG Cuts ' Midnight Jamboree kit to cut these vintage-looking black cat faces.  The bags are just the cheap ol' brown paper lunch sacks that I bought on sale awhile back.  I rolled the tops down and put shredd...

Ghosts and Goblins...Oh My!

Image
Welcome to my stop on Nicolette's  Ghosts and Goblins Blog Hop.  Halloween is one of my favorite holidays.  I love seeing the kids get dressed up, decorating and passing out candy.  We usually only get a few trick-or-treaters, but I make it well worth the effort for them.  One year, I had just one and boy did that little guy clean up!  He was maybe two or three and he got pretty much the whole bowl of goodies I got to pass out.  I'm sure his parents were thrilled.  Anyway, if you're in the Choctaw, Oklahoma area and know where I live, bring your kids to trick-or-treat, I've already bought my treats.  You should have come here from Robin's blog . If you jumped in the middle of the hop and want to start at the beginning, click on Nicolette's link above. I have three project for the first day of the blog hop.  They are all created with Stampin' Up! products. First up is a glassine treat bag and tag.  This is from the...

Christmas in July Blog Hop Day 2

Image
I hope everyone is having a wonderful weekend.  I've recently gone from working in a retail setting to an 8-5 Monday-Friday job.  This is my third weekend in a row I haven't had to work and boy am I relishing them!  I feel so blessed to be able to enjoy time with my family on the weekends now. For Day 2 of the blog hop I again used the "pocket parts" and repurposed them.  The supplies I used are:  Big Kick Die Floral Frames Framelits (Stampin' Up!), repurposed book pages, Glue Glider Pro by Glue Arts, tissue paper. Using the Floral Frames Framelits, I cut several different sizes of the flowers out.  I wadded them up and spread them back out to give them a little extra "body".  Then I layered them until I liked the way they looked.  I'm thinking I'd like to make a Christmas wreath out of them.  They'd also be great to use on cards or gifts.  Lots of possibilities! Here's the entire hop line-up so you can see all of the wond...

Christmas in July Blog Hop

Image
I don't know what the weather is like where you live, but it's hotter than blazes here in Oklahoma. We actually had the hottest day on record today at 109 degrees here in Oklahoma City. Now I love summertime, but 109 is a little too warm even for me. It was nice to think about an occasion that we normally celebrate with cooler temperatures. I started a new job a little over a week ago at a law office. One of the tasks I was given was updating the books in the library. When I was finished I had a lot of "pocket parts". Instead of throwing them away I figured out a way to repurpose them. For this project I used: Sizzix Bigz die scalloped circles, Sizzix Big Kick, Glitter Blast Cherry Bomb, cream tulle, Scotch Quick Dry adhesive and the pocket parts. Now, for the how to part.  First I took the pocket parts and cut out LOTS of scalloped circles using the Sizzix Big Kick and scalloped circle Bigz Die (retired from Stampin' Up!).  Next, I wadded them up and open...

Red, White, and Blue Blog Hop

Image
Welcome to my part of Nicolette's  Red White and Blue Blog Hop.  You should have hopped here from Robin .  I  have a couple of different projects for this one.  Tomorrow, two fellow Stampin' Up! Demonstrators and I are hosting a card workshop with a Fourth of July Theme.  I created these for door prizes. The first project, a tea bag dispenser box, is from SVG Cuts  Tea for You and Me collection.  I used plain navy and red cardstock for the actual boxes and the patterned paper for the panels is from The Nantucket Stack by DCWV I bought last year.  The ribbon is from Michael's Celebrate It line. The second project, a match box, is a retired Stampin' Up! Sizzix die.  I used cardstock for the base and the paper on the outside of the box is from the Stampin' Up Nautical Expedition designer series.  I used the "Its A Wrap...Occasions" stamp set to create wrappers around Hershey Nuggets.  The stars are actually fro...

Mom's Day Blog Hop

Image
Welcome to my part of Nicolette's Mom's Day Blog Hop.  If you're following along the hop, you should have come here from Jamie's  blog.  I had a different, more involved, project in mind when I started thinking about what I wanted to do for the hop, but ended up running out of time to finish it.  So, these are my "back-up" projects.  The tea cup and coffee cup are both from the Cricut Tags, Bags, Boxes and More 2 cartridge.  These were my first attempts and I can see where they need a little "adjusting," but turned out okay.  They actually went together easier than I thought they would.  I cut the tea cup at 11" which made a good sized cup.  The biggest I could get the coffee cup to cut on the Expression was at 6" and it turned out pretty tiny.  I was only able to fit four of the Lindt chocolates in it.  Maybe a little bag of jelly beans or chocolate covered raisins would fit better.  ...

Nicolette's Valentines Day Blog Hop

Image
Hi and welcome to my part of Nicolette's  Valentine Blog Hop.  I have to admit, I've been stumped for an awesome Valentine project so far.  I guess I'm still stuck on Christmas or something. SVG Cuts  released a set of One Piece Boxes that require only one 12X12 piece of paper/cardstock to put together.  I thought I'd give them a try for this project.  The box went together very easily.  I did use a second piece of paper for the accent pieces on the top and sides.  It is a great size for holding a sweet little treat of some sort.  I love the doily-look on the top.  The paper is from a K & Co pad I had from Valentine's Day last year.  I have seen it in Michael's already this year, so it is still available. Thanks for looking today!  Next on the hop is Amy Jo .  Have a great weekend!

30 Days of Handmade Gifts - Day 28

Image
Welcome to Day 28 of The Scrapoholic's  30 Days of Handmade Gifts.  I woke up yesterday morning panicked that my day to post was yesterday!  Needless to say, I was very relieved when I saw it was actually Jann's day.  I managed to get a few gifts bought without venturing out into the madness of Black Friday.  How do you feel about Black Friday shopping?  Myself, I prefer to avoid the crowds. Anyway, on to my project for today.  I started with this: A plain wood step stool, sponge brush (I used 2), Liquitex Burnt Umber acrylic paint, Triple Thick, a piece of patterned scrapbooking paper, and not pictured is one piece of brown cardstock. I didn't take photos of all of the steps.  Paint the step stool with your chosen color of paint.  Let it dry thoroughly.  Cut the patterned scrapbook paper to size to fit the top of the step stool.  I used the Triple Thick to stick it down.  Let it dry thoroughly (this will help keep your...

30 Days of Handmade Christmas Gifts - Day 21

Image
Hello!  I hope everyone is enjoying The Scrapoholic's  30 Days of Handmade Christmas Gifts.  My project for today is homemade chocolate truffles.  I actually used two different recipes.  One is from The Pioneer Woman , a fellow Okie.  I've made her chocolate truffles with sea salt twice now with amazing results.  The other is from a local church's cookbook, but I'm guessing the recipe for Oreo Truffles is easily found on the internet.  Its a pretty easy recipe requiring only three ingredients.  My only advice is to buy plenty of the candy melts or almond bark, whichever you choose to dip your truffles in.  I followed the recipes and had to send my dear husband out for more at midnight! A friend of mine came over and we actually made in excess of 300 of these delicious tidbits as favors for my niece's wedding Saturday.  They were a huge hit with the wedding guests.  They would be great packaged in a homemade take-out box. ...

30 Days of Gifts

Image
Welcome to Day 7 of Jill The Scrapoholic's  30 Days of Gifts.  Let me tell you, we had a wild weekend here in Oklahoma.  I got home from work Friday night and made a beeline for the bathroom to change into comfy clothes.  Well, the cat was in the bathroom with what I thought was a cricket.  It turned out to be a copperhead snake.  We've had snakes in the house before, but never poisonous ones.  Saturday after work, I was watching college football when shortly after the games we had a HUGE earthquake. Okay, for some of you a 5.6 magnitude earthquake doesn't sound HUGE, but for an Okie like me that's more accustomed to tornadoes, it was HUGE!  We've apparently had several aftershocks Sunday that were 4.0 magnitude or less.  If you're interested in earthquakes, check out USGS .  There's a really cool realtime map that shows earthquakes and gives information about them.  Let me just say now, I'm very thankful I don...

Fall/Halloween Blog Hop - Day 2

Image
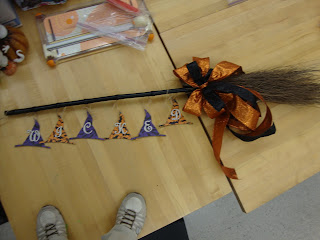
Welcome to my part of Nicolette's  Fall/Halloween Blog Hop for Day 2.  You should have come here from Gill . For today's project, I incorporated a broom, eye screws, Cricut cuts, packaging twine, and another of Lisa's fabulous bows. Yes, those are my Skechers in the picture.  I had to stand on the table to get the whole thing in the picture.  The witches' hats are from the Paper Doll Dress Up cartridge.  I used Make The Cut for the letters.  The font was TypoUpright BT.    I was going to post a close-up picture of the font, but my picture didn't cooperate with the uploading process. From here, please go see what Lisa  has created for your viewing pleasure today.  I hope everyone has a blessed and beautiful Sunday.  - Jackie

Fall/Halloween Blog Hop Day 1

Image
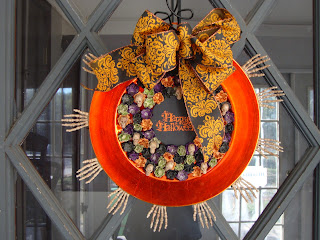
Welcome to my part of  Nicolette's Fall/Halloween Blog Hop.  You should have come here from Gill's .  For my Day 1 project I created a sort-of wreath for the front door. I started with an orange plate charger from Michael's.  The "Happy Halloween" in the middle is actually a coaster, also from Michael's (are you beginning to see a pattern here?).  The flowers are from the Accent Essentials Cricut Cartridge, cut at 1 inch using the Shadow feature and then layered.  I used Bazill cardstock on the flowers.  I also used the Studio G glitter glue from the $1 tower baskets at Michael's on the flowers.   Some of them have little skull beads in the center.  I hot glued everything together.  The skeleton hands were hot glued on the back of the charger to look like they were reaching around.  A ribbon was glued on the back with E6000 as a hanger.  The bow, I have to admit, I didn't do myself.  My good friend, Lisa, fashi...

Ahoy Mateys!

Image
It's International Talk Like A Pirate Day today.  Does anyone have anything special planned to celebrate?  Gill  is hosting a blog hop for both mates and land lubbers.  You should have sailed here from  Lass Leslie-Rahye's .    For my piratical project I made an Emergency Pirate Kit.  The book is actually one of those boxes that looks like a book but has room inside to hide important pirate stuff.  The treasure map I found on the internet, printed out and crumpled up.  I also ran over it with a little Rusty Hinge Distress Ink to give it some age.  The eye patch is from SVG Cuts  Pirate Birthday Party SVG Kit.  You can find it here .  I actually made eyepatches for my Mateys at work to wear today.  That should really make things interesting. I also included a list of important pirate words and their meaning.  There's lots of pirate-y ideas and other info at the official International Talk Li...

Fall Finally!!!

Image
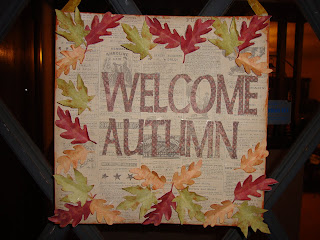
After 60 some odd days of temperatures hovering above 100 degrees, I'm definitely ready for some cooler weather.  The MTC files Jill had us work with for today's The Scrapoholic  design team post definitely put me in a cooler weather frame of mind. I made a sign for my front door with leaves from Jill's Fall collection.  I used papers from several different K & Co pads.  I inked edges of the lighter colored leaves with Tim Holtz Distress ink in Rusty Hinge.  I kind of creased the leaves to make them look a little more realistic.  I'm really enjoying being on Jill's design team and playing with the files she works so hard to create.  So, Thanks Jill, for letting me play along! I know this picture has nothing to do with my design team post and its kind of goofy (this was actually the third try), but I had to show off my youngest nephew.  He and I spent the day together last Thursday and had a ball.  We toured the Museum of Osteolo...

Scrapoholic Design Team Monday!

Image
Happy Monday everyone.  My kids start school tomorrow, today is their last day to sleep in.  I'm ready to be rid of the stinkin' hot temperatures we've had, but not ready for summer to end quite yet.  I actually got to float in the pool for a little bit today and the water was quite refreshing instead of feeling like leftover bathwater.  I'm not sure if we've broken the record of 50 days over 100 degrees yet, but I'm relatively sure it will happen this week if it hasn't already. Now for my design team project from Jill, The Scrapoholic 's SVG/MTC files.  She created some awesome "bling" template files.  They are great, but really made me realize how much I'd like to get something other than a Cricut to cut them with.  The dang thing makes ovals instead of circles!  Anyway, enough about that,  and on to my project. I made a lantern using SVG Attic's Summer Lantern collection and blinged it out with the iRock.  I did put a little...

The Scrapoholic Design Team Monday

Image
Its another Design Team Monday for The Scrapoholic !  Before I get into my project, I just want to say how thankful I am for the cooler temperatures and rain we had here in Oklahoma today.  It has been miserably hot and dry for most of the summer now, so today's weather was a nice reprieve.  How sad is it that I'm looking forward to temperatures closer to 100 than 110 in the upcoming week?!  For my project I created a paperbag mini album with Jill's Palm Trees Collection.  I'm not sure what I'll do with it yet, so I left the inside kind of bare. I made extra little pockets with the flaps that are actually the bottom of the bags. I'll probably add some lined cardstock to the little flaps for journaling and dress the whole thing up a bit more. I did get my niece's wedding invitations and RSVP cards finished and ready for her to pick up today.  I was excited she let me do them for her, but I'm even more excited to be finished with them so she ...

Baby Gift

Image
One of my customers had a baby girl earlier this month.  I made these for her using files from SVG Cuts .  The baby carriage is from SVG Cuts' Bundles of Joy kit.  I stuffed it full of baby girl socks. The card is from SVG Cuts' Breezy Backyard Lever Card kit.  The paper I used is K & Co's "Classic K Charlotte" paper pad.  The pinwheels are a free file from SVG Cuts.  The paper I used for them is DCWV Playtime stack.  A close up of one of the pinwheels.  Its hard to see the pattern on the paper because the colors are so muted. Thanks for looking!

Scrapoholic Design Team Monday!

Image
Its another design team Monday with The Scrapoholic's  MTC/SVG files.  My sister and her kiddos just took a road trip to California.  She's been posting pictures along the way.  I saw this one and knew it would work great with Jill's Surfing and Waves files. The cardstock is from "the stash" with Perfect Paper Adhesive Gloss on top.  I used Smooch Spritz to sort of paint the frame.  I actually poured a little bit on a damp paper napkin and kind of blotted it on.  The frame is one I bought at Michael's a few years ago on clearance. I hope you enjoy my Monday Design Team project.  Have a Great Week!

Peony Cottage

Image
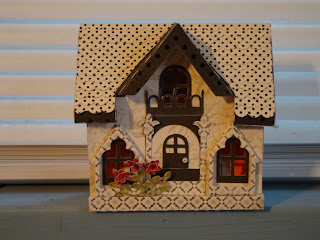
Looking forward to another day with the temperature rising to over 100...NOT!  It will definitely be a good day to stay indoors and work on something crafty.  This is another Peony Cottage from SVG Cuts.   They are so much fun to make and so versatile.  I did this on in black and white prints from the Bella Armoire stack by DCWV.  The little flowers and vines, I used a little color on.  I made this house for a cousin who recently got married.  They asked for Home Depot gift cards, so I thought the house would make a perfect presentation for the gift card. I hope everyone has a great day today!