Posts

Showing posts from 2011

30 Days of Handmade Gifts - Day 28

Image
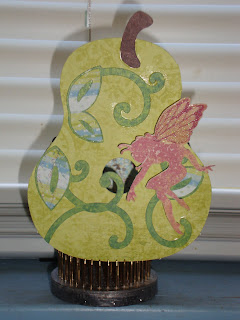
Welcome to Day 28 of The Scrapoholic's  30 Days of Handmade Gifts.  I woke up yesterday morning panicked that my day to post was yesterday!  Needless to say, I was very relieved when I saw it was actually Jann's day.  I managed to get a few gifts bought without venturing out into the madness of Black Friday.  How do you feel about Black Friday shopping?  Myself, I prefer to avoid the crowds. Anyway, on to my project for today.  I started with this: A plain wood step stool, sponge brush (I used 2), Liquitex Burnt Umber acrylic paint, Triple Thick, a piece of patterned scrapbooking paper, and not pictured is one piece of brown cardstock. I didn't take photos of all of the steps.  Paint the step stool with your chosen color of paint.  Let it dry thoroughly.  Cut the patterned scrapbook paper to size to fit the top of the step stool.  I used the Triple Thick to stick it down.  Let it dry thoroughly (this will help keep your paper from bubbling up).  Next figure out what

30 Days of Handmade Christmas Gifts - Day 21

Image
Hello!  I hope everyone is enjoying The Scrapoholic's  30 Days of Handmade Christmas Gifts.  My project for today is homemade chocolate truffles.  I actually used two different recipes.  One is from The Pioneer Woman , a fellow Okie.  I've made her chocolate truffles with sea salt twice now with amazing results.  The other is from a local church's cookbook, but I'm guessing the recipe for Oreo Truffles is easily found on the internet.  Its a pretty easy recipe requiring only three ingredients.  My only advice is to buy plenty of the candy melts or almond bark, whichever you choose to dip your truffles in.  I followed the recipes and had to send my dear husband out for more at midnight! A friend of mine came over and we actually made in excess of 300 of these delicious tidbits as favors for my niece's wedding Saturday.  They were a huge hit with the wedding guests.  They would be great packaged in a homemade take-out box. I used an assortment of dark chocolate

30 Days of Gifts

Image
Welcome to Day 7 of Jill The Scrapoholic's  30 Days of Gifts.  Let me tell you, we had a wild weekend here in Oklahoma.  I got home from work Friday night and made a beeline for the bathroom to change into comfy clothes.  Well, the cat was in the bathroom with what I thought was a cricket.  It turned out to be a copperhead snake.  We've had snakes in the house before, but never poisonous ones.  Saturday after work, I was watching college football when shortly after the games we had a HUGE earthquake. Okay, for some of you a 5.6 magnitude earthquake doesn't sound HUGE, but for an Okie like me that's more accustomed to tornadoes, it was HUGE!  We've apparently had several aftershocks Sunday that were 4.0 magnitude or less.  If you're interested in earthquakes, check out USGS .  There's a really cool realtime map that shows earthquakes and gives information about them.  Let me just say now, I'm very thankful I don't live in California after studying t

Fall/Halloween Blog Hop - Day 2

Image
Welcome to my part of Nicolette's  Fall/Halloween Blog Hop for Day 2.  You should have come here from Gill . For today's project, I incorporated a broom, eye screws, Cricut cuts, packaging twine, and another of Lisa's fabulous bows. Yes, those are my Skechers in the picture.  I had to stand on the table to get the whole thing in the picture.  The witches' hats are from the Paper Doll Dress Up cartridge.  I used Make The Cut for the letters.  The font was TypoUpright BT.    I was going to post a close-up picture of the font, but my picture didn't cooperate with the uploading process. From here, please go see what Lisa  has created for your viewing pleasure today.  I hope everyone has a blessed and beautiful Sunday.  - Jackie

Fall/Halloween Blog Hop Day 1

Image
Welcome to my part of  Nicolette's Fall/Halloween Blog Hop.  You should have come here from Gill's .  For my Day 1 project I created a sort-of wreath for the front door. I started with an orange plate charger from Michael's.  The "Happy Halloween" in the middle is actually a coaster, also from Michael's (are you beginning to see a pattern here?).  The flowers are from the Accent Essentials Cricut Cartridge, cut at 1 inch using the Shadow feature and then layered.  I used Bazill cardstock on the flowers.  I also used the Studio G glitter glue from the $1 tower baskets at Michael's on the flowers.   Some of them have little skull beads in the center.  I hot glued everything together.  The skeleton hands were hot glued on the back of the charger to look like they were reaching around.  A ribbon was glued on the back with E6000 as a hanger.  The bow, I have to admit, I didn't do myself.  My good friend, Lisa, fashioned it for me because mine always

Ahoy Mateys!

Image
It's International Talk Like A Pirate Day today.  Does anyone have anything special planned to celebrate?  Gill  is hosting a blog hop for both mates and land lubbers.  You should have sailed here from  Lass Leslie-Rahye's .    For my piratical project I made an Emergency Pirate Kit.  The book is actually one of those boxes that looks like a book but has room inside to hide important pirate stuff.  The treasure map I found on the internet, printed out and crumpled up.  I also ran over it with a little Rusty Hinge Distress Ink to give it some age.  The eye patch is from SVG Cuts  Pirate Birthday Party SVG Kit.  You can find it here .  I actually made eyepatches for my Mateys at work to wear today.  That should really make things interesting. I also included a list of important pirate words and their meaning.  There's lots of pirate-y ideas and other info at the official International Talk Like A Pirate Day  website, even an English-to-Pirate translator.  I also hav

Fall Finally!!!

Image
After 60 some odd days of temperatures hovering above 100 degrees, I'm definitely ready for some cooler weather.  The MTC files Jill had us work with for today's The Scrapoholic  design team post definitely put me in a cooler weather frame of mind. I made a sign for my front door with leaves from Jill's Fall collection.  I used papers from several different K & Co pads.  I inked edges of the lighter colored leaves with Tim Holtz Distress ink in Rusty Hinge.  I kind of creased the leaves to make them look a little more realistic.  I'm really enjoying being on Jill's design team and playing with the files she works so hard to create.  So, Thanks Jill, for letting me play along! I know this picture has nothing to do with my design team post and its kind of goofy (this was actually the third try), but I had to show off my youngest nephew.  He and I spent the day together last Thursday and had a ball.  We toured the Museum of Osteology in Del City, OK.  We both

Scrapoholic Design Team Monday!

Image
Happy Monday everyone.  My kids start school tomorrow, today is their last day to sleep in.  I'm ready to be rid of the stinkin' hot temperatures we've had, but not ready for summer to end quite yet.  I actually got to float in the pool for a little bit today and the water was quite refreshing instead of feeling like leftover bathwater.  I'm not sure if we've broken the record of 50 days over 100 degrees yet, but I'm relatively sure it will happen this week if it hasn't already. Now for my design team project from Jill, The Scrapoholic 's SVG/MTC files.  She created some awesome "bling" template files.  They are great, but really made me realize how much I'd like to get something other than a Cricut to cut them with.  The dang thing makes ovals instead of circles!  Anyway, enough about that,  and on to my project. I made a lantern using SVG Attic's Summer Lantern collection and blinged it out with the iRock.  I did put a little bat

The Scrapoholic Design Team Monday

Image
Its another Design Team Monday for The Scrapoholic !  Before I get into my project, I just want to say how thankful I am for the cooler temperatures and rain we had here in Oklahoma today.  It has been miserably hot and dry for most of the summer now, so today's weather was a nice reprieve.  How sad is it that I'm looking forward to temperatures closer to 100 than 110 in the upcoming week?!  For my project I created a paperbag mini album with Jill's Palm Trees Collection.  I'm not sure what I'll do with it yet, so I left the inside kind of bare. I made extra little pockets with the flaps that are actually the bottom of the bags. I'll probably add some lined cardstock to the little flaps for journaling and dress the whole thing up a bit more. I did get my niece's wedding invitations and RSVP cards finished and ready for her to pick up today.  I was excited she let me do them for her, but I'm even more excited to be finished with them so she

Baby Gift

Image
One of my customers had a baby girl earlier this month.  I made these for her using files from SVG Cuts .  The baby carriage is from SVG Cuts' Bundles of Joy kit.  I stuffed it full of baby girl socks. The card is from SVG Cuts' Breezy Backyard Lever Card kit.  The paper I used is K & Co's "Classic K Charlotte" paper pad.  The pinwheels are a free file from SVG Cuts.  The paper I used for them is DCWV Playtime stack.  A close up of one of the pinwheels.  Its hard to see the pattern on the paper because the colors are so muted. Thanks for looking!

Scrapoholic Design Team Monday!

Image
Its another design team Monday with The Scrapoholic's  MTC/SVG files.  My sister and her kiddos just took a road trip to California.  She's been posting pictures along the way.  I saw this one and knew it would work great with Jill's Surfing and Waves files. The cardstock is from "the stash" with Perfect Paper Adhesive Gloss on top.  I used Smooch Spritz to sort of paint the frame.  I actually poured a little bit on a damp paper napkin and kind of blotted it on.  The frame is one I bought at Michael's a few years ago on clearance. I hope you enjoy my Monday Design Team project.  Have a Great Week!

Peony Cottage

Image
Looking forward to another day with the temperature rising to over 100...NOT!  It will definitely be a good day to stay indoors and work on something crafty.  This is another Peony Cottage from SVG Cuts.   They are so much fun to make and so versatile.  I did this on in black and white prints from the Bella Armoire stack by DCWV.  The little flowers and vines, I used a little color on.  I made this house for a cousin who recently got married.  They asked for Home Depot gift cards, so I thought the house would make a perfect presentation for the gift card. I hope everyone has a great day today!

My First Design Team Post!

Image
It is stinkin' hot here in Oklahoma.  We're going on several days of temperatures above 100.  Definitely good weather to stay inside and create.  My dogs are the only ones that don't think its too hot to swim.  The pool water feels like leftover bathwater its so hot.  I'm definitely ready for some rain and cooler temperatures. I am sooo excited to be posting this today.  Its my first project for The Scrapoholic  and her MTC/SVG files.  Thank you Jill for choosing me for this Design Team group.  It is my first opportunity to be on a Design Team. The sun and cloud are from The Scrapoholic's "Sun n Clouds" MTC/SVG collection you can find on her blog.  The card is 6 x 6.  I used blue ink around the edges.  I used cardstock from "the stash" for all of it but the card base.  Its from Michael's Recollections brand (on sale this week 5 sheets for $1.00 for the .59 paper).  I glittered the sun with Lemon Drop from Martha Stewart's iridescen

3D Letters

Image
SVG Cuts  came out with a set of really cool 3D letters.  Some are more challenging than others.  Let me just say, I'm relieved none of my kids have an "S" or "O" in their first names! Obviously, this isn't for one of my kids because the name has BOTH an "S" and "O"!  This is for a friend of my daughter's who is having a birthday.  I really had fun making it.  Just really had to take my time on the curvy letters. The base for the letters is Recollections kraft-style cardstock.  The front is a chocolate and cream zebra stripe from the papers by the sheet racks at Michael's.  It didn't have a brand name on it.  I glittered the edges of the stripes with Recollections Bubble Gum glitter using Martha Stewart Glitter Glue.  Let me tell you, that glitter glue is fine stuff if you can get it out of the bottle!  I felt like I was trying to decorate a cake, squeezing that glue out!  The little roses are also Recollections and I att

Fairy Day Blog Hop - Day 2

Image
Welcome to my part of the Fairy Day Blog Hop for Day 2.  You should have started at Creations By Gill M  and come here from there! I made two similar projects for today. For both of my projects I used SVG Cuts  Spring Birdhouse set with the gourd birdhouse.The paper on the first one is K & Company's Que Sera Sera.  The fairy is cut from a page out of the Once Upon A Time stack. This second fairy house is my favorite by far.  The cute little fairy is actually a photo of my now 13-year-old daughter when she was 3!  I had to scan it in because I couldn't find the disc (imagine not being able to fine a disc after 10 years and a move!), so I lost some of the picture quality.  The "for lease" sign is from the same photo.  I did put a little "pixie dust" in the form of some Martha Stewart Sugar Cube iridescent glitter on her wings.  The butterfly is from The Graphics Fairy.   I printed it out twice and glittered the top layer with Martha's Orange Sorb

Fairy Day Blog Hop Day 1

Image
Happy Fairy Day and welcome to my part of the Fairy Day blog hop.  The hop starts at Creations by Gill M .  If you didn't start there, please go back and do so.  You should have hopped here from Leslie Rahye .  This is a hop with a difference as along the hop there are letters to find in the postings - not all blogs have the letters but if you gather all the letters then at the end of the hop on day 2 assemble them to create a fairy related word. If you then return to Creations by Gill M and enter the Mr Linky at the bottom of the post (do not reveal the secret word yet). After the hop she will contact someone at random and ask them to email her with the word - if correct they win some lovely candy. Now, for my Day 1 project.  For those of you that participated in the Vacation Blog Hop, you'll recognize the flowers I made for this project. They're made of crepe paper!  This time I used white, canary yellow, and light pink.  Once the white ones were rolled up I sprit

Officially Summer Blog Hop Day 2

Image
Welcome to Day 2 of The Scrapoholic 's Officially Summer Blog Hop.  You should have come to my blog from Sarah .  Hope everyone had a great first day of summer yesterday.  We got a little relief from the relentless heat we've been having here in Oklahoma, thank goodness!  I love reading the comments you all are posting.  I'm always flattered when someone wants to "scraplift" an idea from me.  Please feel free to do so anytime.  If you're a Facebook junkie like me, "like" SVG Cuts page and check out the great projects posted from their cut files.  They are absolutely incredible.  The pieces on the dimensional projects go together so easily. I had computer issues yesterday and had to take the one I usually work on to get fixed.  My project for today is a quickie.  A pinwheel for the Fourth of July.  Once again, the cut file came from SVGCuts.com .  This one is actually a freebie from the blog there.  I just love the instructional videos they mak

Officially Summer

Image
Happy first day of Summer!  Thanks for stopping by to see my first creation for the The Scrapoholic 's Officially Summer blog hop. You should have come here from Sarah . I had so much fun creating this Surf Shack.  I've been thinking about it for almost a month now and finally did it.  It took me a couple of days to get it finished.  About halfway through, my thirteen-year-old daughter told me it was "too symmetrical".  I tried to make it a little more off kilter just for her!  The file is from SVG Cuts  and is the Peony Cottage.  I also used Beach Bum I and Beach Bum II to complete the Surf Shack look. The only cut I really altered is the front door.  It is the bottom piece of the surfboard from Beach Bum II.  I made it shorter and wider than a regular surfboard.  I used just plain cardstock for all of the cuts. The roof is paper raffia found in the gift wrap aisle at Michael's.  I did try to rough it up a bit to give it more of a weathered look.  The p

Vacation Blog Hop

Image
Hello Everyone!  I hope you're having a great day and enjoying the Vacation Blog Hop so far.  You should have come to my blog from Jill's .  Instead of a traditional project incorporating pictures, I stepped out on a limb and did something out of my comfort zone. Our vacations usually involve water of some sort, the beach or lake.  My project is a swimsuit made of mostly paper.  I did cut up a bra I bought awhile back that was very uncomfortable and used it for the form of the top.   The skirt/bottoms, I used wrapping paper and traced around a pair of my swimsuit bottoms to get the base.  I taped the front and back panels together. The roses are crepe paper streamers.  I cut the streamers in half length-wise and then did lots of rolling and twisting.  I actually covered the entire front and back of the skirt in these silly flowers.  I didn't count to see how many I actually made, but just to give you an idea there are over 100 on each "cup" of the top.  If

Blog Candy Winners!

Sorry, I'm late in getting this post up.  I do want to congratulate the blog candy winners from Jenn's Birthday Blog Hop.  Someone also asked if they could "scraplift" one of my projects.  Please, feel free to scraplift away!  I'm very flattered and honored at the thought of someone wanting to scraplift. Melissa - Very nice project, great job! My best birthday gift had to be getting my new cartridges I wanted last year! Jill/TheScrapoholic - This is so gorgeous! I remember going to someone b-day party and there were a bunch of games and one was bobbin for apples and I lost one of my top tooth while bobbin but got the apple while loosing the tooth! And, I added one more, just because it was so sweet I teared up when I read it! Christine - Wow! I would love to make these flowers for my scrapbook room but don't know if I am talented enough to do it! Just beautiful. Ok here is another "favorite birthday story" when my son Brian was in kinde

Birdhouse

Image
Here's another project for Jenn's  Birthday Blog Hop.  You should have hopped here from Jill's  blog.  If not, go back to Jenn's and start at the beginning.  There are lots of great projects. The template for the birdhouse is from Nichole Heady at PaperTreyInk.  Its super easy to put together.  You can probably tell, I left one side open so it can hold a surprise for someone special.  I also added a base on the bottom that wasn't part of the original template.  It would be easy to dress it up more than I have also.  Add some flowers, a tag, and what not.  I had grand plans of making it really fancy, but it has been a REALLY long day today and I'm ready for bed. The paper is K & Company from the Que Sera Sera pad.  The bird stamp is out of a set by Inkadinkadoo.  I used StazOn Timber Brown ink.  I also used some of the crinkle seam-binding ribbon I hand-dyed with Smooch Spritz.  Before you hop on to see what  Shelley  has created, be sure to leave a co

Butterfly Card

Image
Here's another project for Jenn's  40th Birthday Blog Hop.  You should have come here from Jill's  blog.  The butterfly is off of the Sentimentals cartridge.  I've had it for awhile, but this is the first time I've used it.  I actually looked at the butterflies on the Florals Embellished cart, but decided there were way too many cuts for my patience today.  I stickled the darker layer on top and added an extra layer on the bottom to pop it up a little bit.  I was thinking the butterflies would look really good on short dowel rods and put in the vase with the hydrangeas I finished up last night.  Might have to make them a little smaller though. I've had so much fun reading everyone's comments, I've decided I'll do at least two blog candy sets!  Before you move on to the next stop on the hop, please leave a comment and tell me about the best birthday party you attended as a kid and don't forget to leave me your email if you haven't previo

A Birthday Bouquet

Image
Okay, I was only going to do one project for Jenn's Blog Hop because those banners take for-stinkin-ever for me to get them just they way I like 'em.  However, I found some hydrangeas I had started on last week and decided I'd get them finished up for a "birthday bouquet" of sorts. They were really fun to make.  AND  I got to use one of my favorite vases!  The vase is crystal and was given to my husband and I as a wedding gift.  The hydrangeas themselves started as cut files from Penny Duncan Creations.   She has created cut files and YouTube videos with complete instructions for making these beautiful flowers.  Of course, I tweaked her instructions just a little for these.  I enlarged the files and used 2 inch Styrofoam balls cut in half.  I used the pink skittles in the centers.  You can tell on the dark pink one the glue isn't quite dry.  I tried using a glue gun to glue down the skittles, but it kept melting the glue on the back of the florets and ever

LORDY,LORDY JENN IS 40!!!!

Image
First and foremost, I'd like to wish my good friend Jenn a very,very Happy 40th Birthday!  I hope your day is absolutely fabulous. Now, down to business.  Jenn  is hosting a blog hop to celebrate this milestone birthday. if you are following the hop, you should have come from  Jill's Blog .  You probably want to go back to Jenn's blog and start at the beginning.  I hear there's lots of good blog candy along the way, and I'd hate for anyone to miss the opportunity for blog candy!  I chose to make a birthday banner for her.  Hopefully, it will be in her hands today for her birthday as I mailed it out last week.  As you can probably see, I didn't make a traditional birthday banner.  The number one song on Jenn's birth date was "Joy To The World" by Three Dog Night.  The "world" cuts are from Cricut's Give A Hoot Cartridge.  I used MTC for the font.  I also made fabulous purple crinkle ribbon from seam binding and Smooch Spritz to s